
Most container images start out pretty simple. You pick a base image, install what the application needs, build the code, and ship it. It works, so nobody thinks much about what else ended up inside that image.
The problem is that the final image can easily carry a lot more than the application actually needs to run. A shell, package manager, build tools, source files, and other utilities may all still be there even though the application never uses them in production.
Distroless images take the opposite approach. Instead of asking, “What should we remove from this image?”, the idea is closer to, “What is the minimum this application actually needs to run?” That gives you a much smaller runtime, but it also removes many of the tools engineers normally depend on when something goes wrong.
That is where this gets interesting. A distroless container can run perfectly fine in production, but the first time you try kubectl exec -it <pod> -- /bin/sh, there may be no shell to open at all. This blog is about that tradeoff, how multi-stage builds help create minimal runtime images, and how to debug them when the usual tools are gone.
What Is a Distroless Image?
Think of a normal container image as a small Linux environment around your application. It may have a shell, package manager, system tools, libraries, and sometimes even things that were only needed during the build.
A distroless image removes most of that surrounding environment. What stays is the application itself and the runtime pieces it actually needs, such as required libraries, CA certificates, timezone data, or a language runtime depending on the image.
So if a normal image feels like a small Linux machine with your application inside it, a distroless image feels more like just the application plus the minimum support it needs to run.
That is great for keeping the runtime small and reducing unnecessary software, but it changes debugging completely. There may be no sh, no bash, no ls, no cat, no curl, and no package manager waiting inside the container when you need them.
Why Distroless Removes the Shell on Purpose
The missing shell is deliberate. Distroless is designed for runtime, not for interactive administration inside the container. If the application does not need a shell, package manager, or common Linux utilities to do its job, those tools do not need to be part of the production image either.
Removing the shell is not just about saving a few megabytes. Keeping the runtime image limited to what the application actually needs reduces the amount of software that has to be maintained, scanned, and patched. Google also points out that this improves the signal-to-noise ratio of vulnerability scanners because the image contains fewer unrelated packages and utilities.
There is a security benefit as well. If a container is compromised, having fewer built-in tools gives an attacker less to work with inside that container. Distroless does not turn a vulnerable application into a secure one, but removing unnecessary shells, package managers, and utilities reduces the runtime surface that exists around the application.
What a Multi-Stage Build Actually Discards
In a single-stage Dockerfile, the build environment and runtime environment share the same image. Unless the Dockerfile explicitly cleans things up, compilers, development dependencies, source files, package-manager data, and other build-time files can end up in the image that eventually gets deployed.
A multi-stage build separates those responsibilities into different stages inside the same Dockerfile. An early stage can use a full development image with compilers and build tools, while the final stage starts from a much smaller runtime image. COPY --from is then used to copy only the artifacts needed at runtime into that final stage.
The important distinction is that the earlier build stages are not included in the final image. Docker may still keep their layers in its build cache for faster future builds, but the compiler, source code, package-manager cache, and other build-time files do not become part of the deployed image unless you explicitly copy them into the final stage.
| # Stage 1: build the application with full tooling available FROM golang:1.26 AS build WORKDIR /src COPY . . RUN CGO_ENABLED=0 GOOS=linux go build -o /app/server # Stage 2: final image contains the application and runtime essentials FROM gcr.io/distroless/static-debian13 COPY --from=build /app/server /app/server ENTRYPOINT ["/app/server"] |
An easy mistake at this stage is copying more from the build stage than the runtime actually needs. Using COPY --from=build /app /app instead of naming the specific binary drags along anything else that happened to land in that directory during the build, defeating a meaningful part of the size reduction the second stage was supposed to provide. Naming the exact file or files needed, rather than the whole directory, is what actually makes the second stage minimal instead of just smaller.
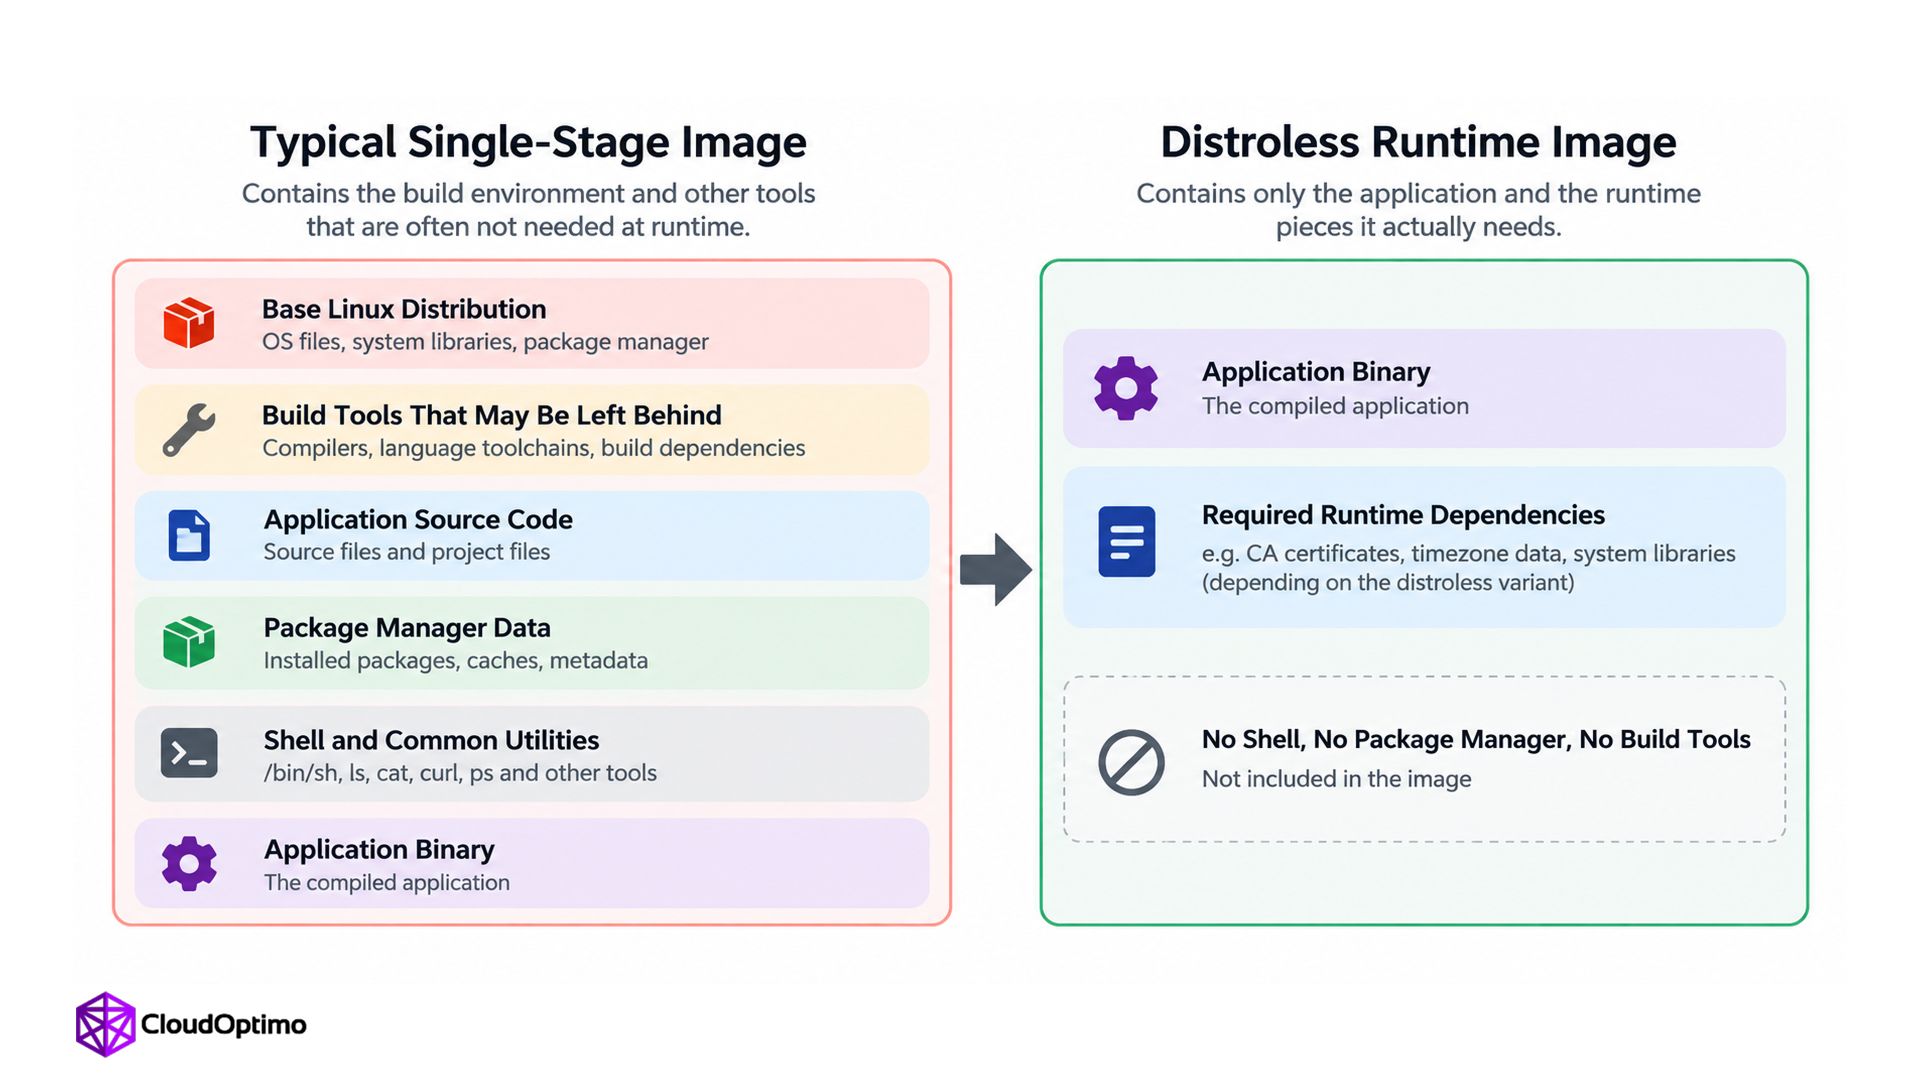 Figure 1: Typical single-stage image vs distroless runtime image. A single-stage image can retain build tools, source files, package data, and shell utilities, while a distroless runtime image contains only the application and the runtime dependencies it needs. Not every distroless image is equally empty
Google publishes several distroless variants, and choosing the right one depends on what the application needs at runtime. The static image is intended for binaries that do not require libc and contains only a very small set of supporting files such as CA certificates and timezone data. base-nossl adds glibc, while base adds glibc and SSL libraries. There are also runtime-specific images for Java, Python, and Node.js.
This distinction matters for compiled applications. A Go binary built with CGO or another dynamically linked binary may depend on libraries that are not present in static. In that case the container can fail at startup with a missing-library or loader error even though the application compiled successfully. Checking whether the binary is actually static before choosing the final image saves a surprisingly confusing debugging session.
Then Shell-Based kubectl exec Stops Working
A common way to inspect a running container is kubectl exec -it <pod-name> -- /bin/sh. With a normal distroless image, that command fails because /bin/sh does not exist. The same thing happens with docker exec if you try to launch a shell that is not part of the image.
kubectl exec itself is not broken. It can still execute a binary that actually exists in the container. What disappears is the usual toolbox of sh, ls, cat, ps, curl, and similar commands that engineers normally rely on during interactive debugging.
This behavior is intentional. Distroless removes tools that the application does not need at runtime, but those are often the same tools engineers reach for when something goes wrong. The production image becomes smaller and more predictable, while interactive debugging has to move outside that container.
Distroless also publishes debug variants that include a BusyBox shell. They are useful for local debugging or for deliberately running a temporary debug build, but switching an already-running production workload to a different image usually means replacing or restarting that workload. Kubernetes ephemeral containers solve a different problem: they let you bring debugging tools to the pod that is already running.
Debugging a Container Without a Shell
Kubernetes solves this with ephemeral containers, a feature that has been stable since Kubernetes 1.25. An ephemeral container can be added to an existing running Pod specifically for troubleshooting, without restarting the application's regular containers or replacing the Pod first. Kubernetes adds it through a dedicated ephemeralcontainers API rather than treating it like a normal application container.
# Attach a fully-equipped debug container to a running distroless pod kubectl debug -it <pod-name> \ --image=nicolaka/netshoot \ --target=<container-name> |
The --target flag asks Kubernetes to place the ephemeral container in the process namespace of the container being debugged. When the container runtime supports this, tools such as ps inside the debug container can see the application's processes even though those tools do not exist in the distroless image itself.
There is one important caveat: support for targeting another container's process namespace depends on the container runtime. If the runtime does not support it, the debug container may start with an isolated process namespace and the target application's processes will not appear.
Once the target processes are visible, find the application's PID rather than assuming it is PID 1. You can then inspect paths such as /proc/<pid>/root, /proc/<pid>/fd, and /proc/<pid>/maps. Linux exposes the target container's filesystem through /proc/<pid>/root, subject to the normal permissions and security restrictions. The shell and debugging tools still belong to the ephemeral container, not to the distroless application container.
What the Debug Container Can Inspect
| Command from inside the debug container | What it helps you inspect |
|---|---|
| ps aux | Processes visible in the shared or targeted process namespace. Use this to find the application's PID. |
| ls /proc/<pid>/root/ | The target process's container filesystem, subject to filesystem permissions. |
| ls -l /proc/<pid>/fd/ | The file descriptors currently opened by the target process, including files, pipes, and socket descriptors. |
| cat /proc/<pid>/maps | The target process's current memory mappings, including mapped executables and shared libraries. |
One-way door: Once an ephemeral container has been added to a Pod, it cannot be removed or restarted like a normal container. If it exits, its record remains with that Pod until the Pod is deleted or replaced. Ephemeral containers also cannot define their own CPU or memory requests and limits. They use resources that are available to the existing Pod, and Kubernetes warns that a heavy debugging container can contribute to the Pod exceeding its resource allocation and potentially being evicted. That is worth remembering before launching a large debugging image against a resource-constrained production workload. |
Logging discipline matters more once exec is gone
Teams that adopt distroless without reconsidering observability often discover that their old debugging habits depended heavily on shell access. Structured logs written to stdout, useful application metrics, distributed traces, clear health signals, and external dashboards become much more important when exec is no longer the first troubleshooting tool.
Ephemeral containers are valuable when deeper inspection is genuinely needed, but they should be the exception rather than the normal way to understand what an application is doing. A production service should expose enough telemetry that most failures can be understood without opening a shell inside the workload at all.
When Distroless Is Worth the Tradeoff
Distroless makes the most sense when the production runtime should contain as little unnecessary software as possible. Internet-facing services, workloads that handle sensitive data, and environments with strict vulnerability-management requirements are obvious examples.
That does not mean the same image has to be used for every stage of development. A practical setup is to keep a development or debug target with the tools engineers need, while producing a distroless image for production. Multi-stage Dockerfiles make that separation straightforward: one target can optimize for developer convenience while another optimizes for a minimal runtime.
The pattern worth remembering is simpler than either term on its own. Multi-stage builds control what reaches the final runtime image. Distroless reduces that runtime environment to the pieces the application actually needs. When deeper inspection is necessary, ephemeral containers bring the debugging tools to the running Pod instead of permanently putting those tools back into the application image.
That separation is the real benefit: a small production image when everything is healthy, and a controlled way to bring in debugging tools when something is not.

